GPIO 라이브러리 수동 설치
소스 파일 복사
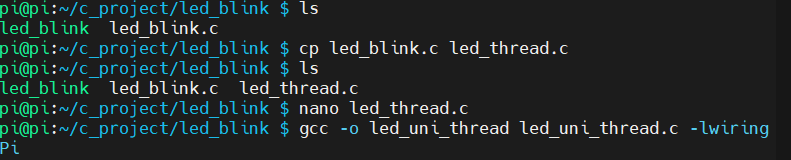
cp led_blink.c led_thread.c- led_blink.c를 led_thread.c로 복사
- 기존 코드 기반으로 새로운 스레드용 코드 작성하기 위한 준비
새 파일 코드 편집
bash
복사편집
nano led_thread.c- led_thread.c 파일을 nano 에디터로 열어 코드 수정 시작
새 코드 컴파일
gcc -o led_uni_thread led_uni_thread.c -lwiringPi- led_uni_thread.c를 led_uni_thread 실행 파일로 빌드
- lwiringPi: WiringPi 라이브러리를 링크
기존 WiringPi 디렉토리 삭제
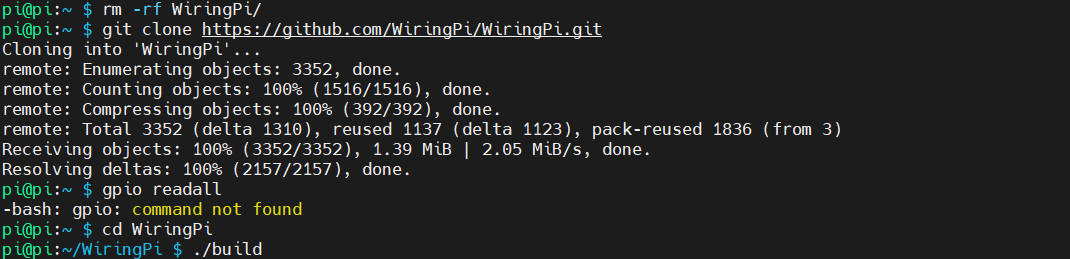
rm -rf WiringPi/- 혹시 남아있던 WiringPi 소스 디렉토리를 강제로 삭제
WiringPi 소스 코드 클론
git clone https://github.com/WiringPi/WiringPi.git- GitHub에서 WiringPi 소스 코드 전체를 다운로드
- 로컬에 WiringPi/ 디렉토리가 새로 생김
설치 확인 (gpio 명령 존재 여부 체크)
gpio readall- gpio 명령이 설치되어 있지 않아 command not found 발생
- 따라서 WiringPi 빌드가 아직 완료되지 않았음을 확인
WiringPi 디렉토리로 이동
cd WiringPi- 클론한 WiringPi 디렉토리로 이동
빌드 스크립트 실행
./build- WiringPi를 컴파일 및 설치
- gpio 명령어와 라이브러리 파일이 시스템에 배치됨
사용 코드
2개의 thread를 생성하여 각각 500ms와 700ms의 주기로 작동하는 LED
#include <stdio.h>      // 표준 입출력 라이브러리
#include <stdlib.h>     // 표준 라이브러리 (NULL 등)
#include <pthread.h>    // POSIX 스레드 라이브러리 (멀티스레드 지원)
#include <unistd.h>     // usleep 함수 사용
#include <wiringPi.h>   // GPIO 제어용 WiringPi 라이브러리

#define PINA 9          // WiringPi 번호 9번 핀
#define PINB 7          // WiringPi 번호 7번 핀

// 700ms 주기로 PINA를 깜빡이는 스레드 함수
void* thread700(void* arg) {
    while(1) {
        digitalWrite(PINA, HIGH);    // PINA 핀에 HIGH 출력 (LED ON)
        usleep(700000);              // 700ms 대기
        digitalWrite(PINA, LOW);     // PINA 핀에 LOW 출력 (LED OFF)
        usleep(700000);              // 700ms 대기
    }
    return NULL;
}

// 500ms 주기로 PINB를 깜빡이는 스레드 함수
void* thread500(void* arg) {
    while(1) {
        digitalWrite(PINB, HIGH);    // PINB 핀에 HIGH 출력 (LED ON)
        usleep(500000);              // 500ms 대기
        digitalWrite(PINB, LOW);     // PINB 핀에 LOW 출력 (LED OFF)
        usleep(500000);              // 500ms 대기
    }
    return NULL;
}

int main() {
    wiringPiSetup();                 // WiringPi 초기화

    pinMode(PINA, OUTPUT);           // PINA를 출력 모드로 설정
    pinMode(PINB, OUTPUT);           // PINB를 출력 모드로 설정

    pthread_t threadA, threadB;      // 두 개의 스레드 ID 선언

    // 두 개의 스레드를 생성하여 각기 다른 주기로 LED 제어
    pthread_create(&threadA, NULL, thread700, NULL);
    pthread_create(&threadB, NULL, thread500, NULL);

    // 스레드가 종료될 때까지 main 스레드는 대기
    // (실제로는 스레드가 무한 루프라 main은 여기서 멈춤)
    pthread_join(threadA, NULL);
    pthread_join(threadB, NULL);

    return 0;  // 프로그램 종료 (실제로는 도달하지 않음)
}
2개의 thread로 구현된 코드를 하나로 구현한 코드
#include <wiringPi.h>    // WiringPi 라이브러리 (GPIO 제어)
#include <stdio.h>       // 표준 입출력 라이브러리
#include <stdlib.h>      // 표준 라이브러리 (NULL 등)
#include <pthread.h>     // POSIX 스레드 (멀티스레드)
#include <unistd.h>      // usleep 함수 (마이크로초 지연)

#define PINA 9           // WiringPi 핀 번호 9
#define PINB 7           // WiringPi 핀 번호 7

// 스레드에서 사용할 인자 구조체
typedef struct {
    int pin;               // 제어할 핀 번호
    useconds_t delay_us;    // on/off 지연 시간 (마이크로초)
} ThreadArgs_t;

// 스레드 함수: 지정된 핀을 주기적으로 on/off
void *thread(void *arg) {
    ThreadArgs_t *args = (ThreadArgs_t *) arg;  // 전달받은 인자 구조체 포인터

    while (1) {
        digitalWrite(args->pin, HIGH);          // LED ON
        usleep(args->delay_us);                 // delay_us 만큼 대기
        digitalWrite(args->pin, LOW);           // LED OFF
        usleep(args->delay_us);                 // delay_us 만큼 대기
    }

    return NULL;  // 도달하지 않음 (무한 루프)
}

int main() {
    wiringPiSetup();                            // WiringPi 초기화
    pinMode(PINA, OUTPUT);                      // PINA 출력 모드
    pinMode(PINB, OUTPUT);                      // PINB 출력 모드

    pthread_t thread1, thread2;                 // 스레드 핸들러 선언

    // 스레드별 인자 설정
    ThreadArgs_t args1 = { .pin = PINA, .delay_us = 700000 };  // 700ms 주기
    ThreadArgs_t args2 = { .pin = PINB, .delay_us = 500000 };  // 500ms 주기

    // 스레드 생성
    pthread_create(&thread1, NULL, thread, &args1);
    pthread_create(&thread2, NULL, thread, &args2);

    // 스레드 종료까지 대기 (사실상 종료되지 않음)
    pthread_join(thread1, NULL);
    pthread_join(thread2, NULL);

    return 0;
}
동작 확인

동작을 확인하면 두 개의 LED를 멀티스레드로 독립 제어하며,
하나는 700ms ON/OFF 주기(PINA), 다른 하나는 500ms ON/OFF 주기(PINB)로 깜빡이는 것을 확인할 수 있다.